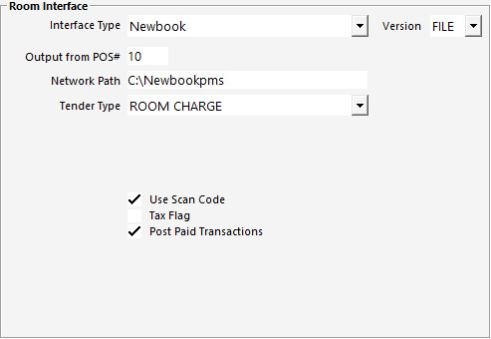
You will need to enter the information that relates to the Newbook setup.
To enable the Room Interface to work on each terminal go to Setup > Global Options > Interfaces > Room Interface.
Interface Type – This is the software that you will be connecting to. Select Newbook.
Version - This is the Version of Newbook being used. Select FILE. If you are configuring the API version, select API and refer to the Newbook API Settings topic for further details.
Output from POS# – This is the POS Number that creates the Output from POS File.
Network Path – Enter the network path to the directory of Newbook.
Tender Type – Select the Room Charge Tender.
Post Paid Transactions – All transactions that have a value against a Tender, other than the above Room Charge tender, will be posted to Newbook as 'Cash Sales'. E.g. Sales paid by Cash, EFTPOS/Tyro Pay@Table or eCommerce will be posted to Newbook as 'Cash Sales'.
Use Scan Code – To use multiple scan codes/wristbands for one guest account, ensure that this option is enabled.
Tax Flag – This controls whether or not tax transactions that are sent to NewBook are charged as Tax or Tax Free.
Note!
This Room Interface requires a POS Master to be entered into the "Output from POS#" field.
Ensure that you enter a POS Terminal number that exists in the same site so that the data is correctly exported to your Room Interface.
Should you enter a POS Terminal Number that does not exist in the same site, the following warning prompt will be displayed each time a terminal starts Idealpos:
WARNING! You have your Room Interface POS Master set to a POS in a different site!
